Creating REST services
Define classes and REST methods for your BASIC subroutines and deploy the REST application.
Creating a REST Service normally consists of the following steps:
-
Create a set of classes that map properties to specific attributes in a dynamic array. A class may contain sub classes in order to generate a complex structure in the result.
-
Create a subroutine definition that defines the input and output parameters of the REST service. Each output parameter can be mapped to a class that will return the data received from the subroutine parameters when called.
In order to demonstrate the processes involved in exposing REST Services in MVsharp, we are going to use a sample database and some sample subroutines to show the configuration process.
The demonstration database contains a file called "INVOICES":
| Field Name | Position | Description |
|---|---|---|
| InvoiceNumber | 0 | The key to the INVOICES file (Numeric) |
| CustomerName | 1 | Customer Name (Alpha Numeric) |
| Address | 2 | Multi Valued List of Addresses (Alpha Numeric) |
| ProductNo | 3 | Multi Valued List of product numbers |
| Quantity | 4 | Multi Valued list of quantities |
| Price | 5 | Multi Valued list of prices |
| OrderTotal | 6 | Total of the order |
The above structure is used to show how to define:
- Address is multivalued but not associated to any other fields
- CustomerName and OrderTotal are single valued fields not associated to other fields
- ProductNo, Quantity and Price are multivalued and all associated with each other.
When translating a multivalued record as above into a class structure, we will need a separate class for each of the associated multi valued fields. In the above example we will have 2 classes:
- Invoice - containing CustomerName, Address, OrderTotal and the Invoice_Detail class
- Invoice_Detail - containing ProductNo, Quantity and Price.
Creating Classes
Classes are created using the MVrest Administrator. Open the MVrest Administrator and select the "Web Services" tab. As mentioned in the introduction, each account has its own definitions for classes and services. Select the "Source System" and "Source Account" where the REST services are going to be created.
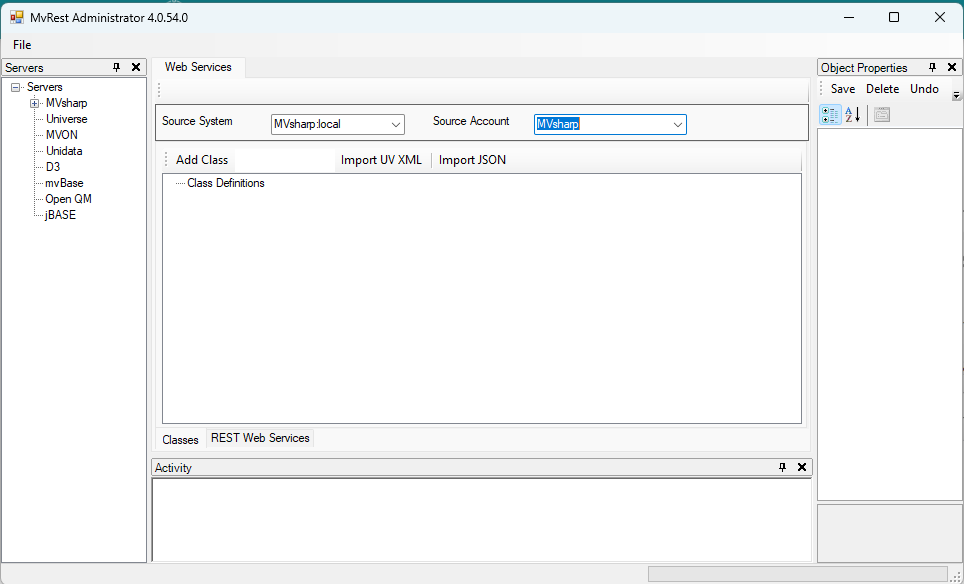
Refer to the MVsharp Administrator manual for details on how to define server connections to the various databases.
-
Select the "Source System" and "Source Account" from the drop downs provided.
-
The first time you access the Web Services tab for an account you will be prompted to create the required files.
-
We first need to create all the associated multivalued classes. This is because the collection editor allows us to select the "ClassName" described above from a dropdown list.
-
Enter the class name "Invoice" in the input box next to "Add Class" and press the "Add Class" button. Repeat the process for "Invoice_Detail".
-
Expand the "Class Definitions" tree item and click on "Invoice".
-
Click on the "(Collection)" button in the Properties Window.
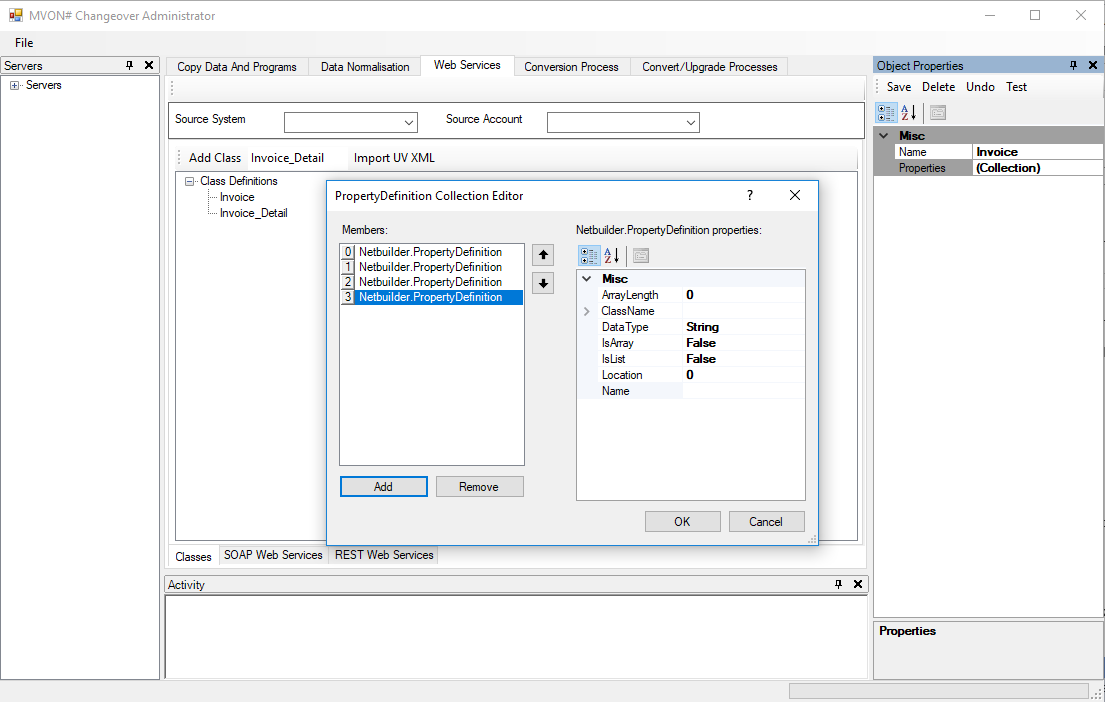
As described above, the Invoice class has 3 properties and 1 class. Click the "Add" button in the Collection editor 4 times to create 4 new properties for this class.
Each property can be configured with the following properties:
Note
ArrayLength and IsArray properties are deprecated and are only there for backwards compatibility.
| Property Name | Description |
|---|---|
| ClassName | The name of an internal class that contains properties. This is used when we have associated multivalues. |
| DataType | REST Subroutines only use the string datatype. MV platforms have no data typing. |
| IsList | Set to true when we have a multivalue that is not associated with any other value. |
| Location | The attribute number that will be populated from an output argument. |
| Name | The name of the property. |
For the first 3 properties, set the name to (CustomerName, Address and OrderTotal) and the Location to (1, 2 and 6). For the Address property, set "IsList" to true as it is a multivalue.
For the 4th property, we are going to define a class that has all our associated multivalued fields (ProductNo, Quantity and Price).
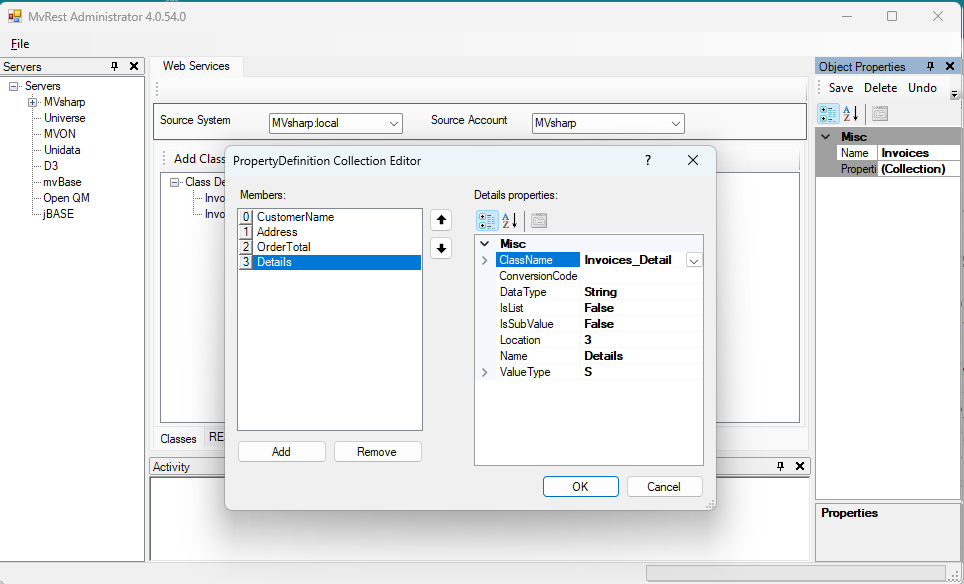
Note the following when specifying an inner class:
- Select the class name from the dropdown list.
- The IsList property should be true if the association is multivalued.
- The location must be set to the controlling multivalue field.
Repeat the above process for "Invoice_Detail" class with properties ProductNo, Quantity and Price with Location set to 3, 4 and 5.
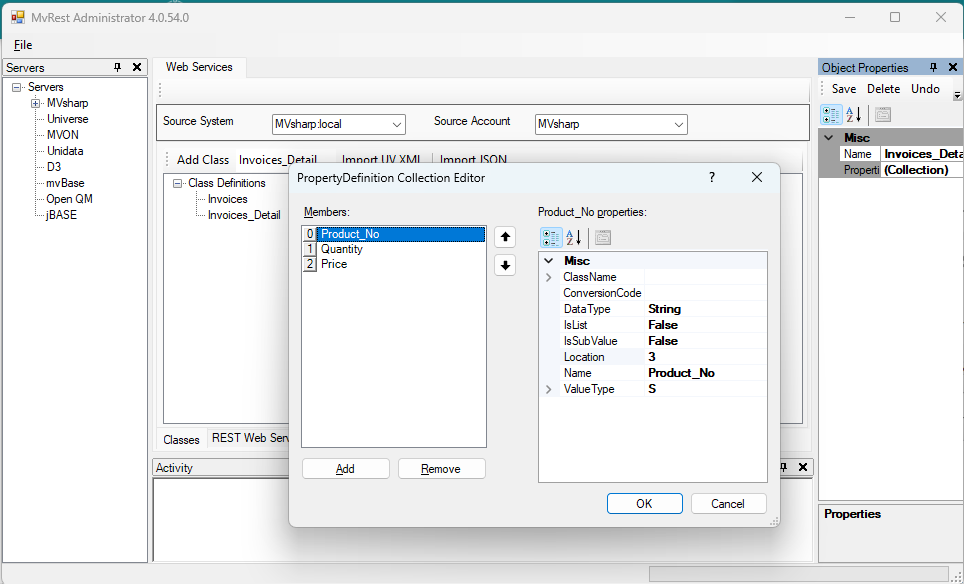
Note the following when specifying the class:
- The "IsList" property is set to false even though the data is multivalued.
- The "IsList" property of the controlling class was set to true, making the entire class multivalued.
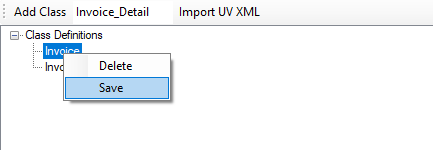
The classes are now complete. You can save each class by clicking on the class in the TreeList, then right clicking the name and selecting Save.
Creating REST Methods
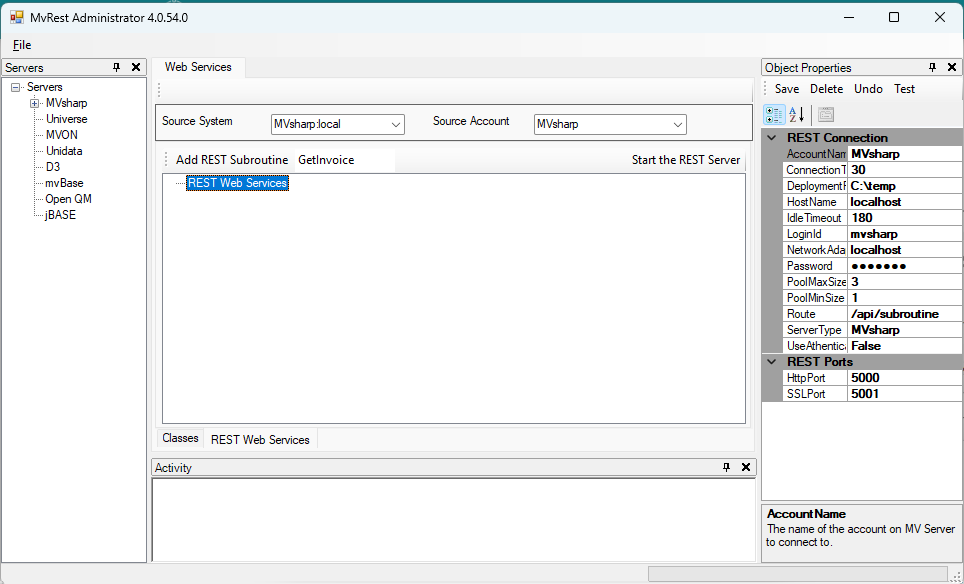
Methods are created using the "REST Web Services" tab located at the bottom of the screen. After selecting the tab and clicking on the REST Web Services tree item the following properties are displayed. These properties are defaulted from your current source connection.
| Property Name | Description |
|---|---|
| AccountName | The account name that contains the data and subroutines. |
| ConnectionTimeout | The number of seconds to wait for a connection before timing out. |
| DeploymentPath | The local path where the .NET Core project will be deployed. |
| IdleTimeout | The number of seconds a connection will stay connected without processing a message. The connection is closed after this period. |
| LoginId | The login id of the user to connect to the MVsharp server. |
| MVSHARPServer | The hostname or IP address of the MVsharp server. |
| Password | The password associated with the login id above. |
| PoolMaxSize | The maximum number of concurrent connections allowed to MVsharp. |
| PoolMinSize | The number of connections to start up when the server is started. |
| Route | The REST route for each subroutine call. |
| HttpPort | The port number for HTTP traffic. If set to 0, HTTP traffic is disabled. |
| SSLPort | The port number for SSL traffic. If set to 0, SSL traffic is disabled. |
You can save any configuration changes by clicking on the "Save" button at the top of the Object Properties.
To create a new subroutine call, enter the subroutine name in the text box next to the "Add REST Subroutine" button and then click the "Add REST Subroutine" button.
For our example the subroutine has 3 arguments: "InvoiceNo", "Status" and "Invoice". The 1st argument is an input parameter, and the 2nd and 3rd are output parameters.
E.g. GetInvoice(InvoiceNo,Status,Invoice)
Click on the "Parameters" button in the Object Explorer and add 3 Parameters.
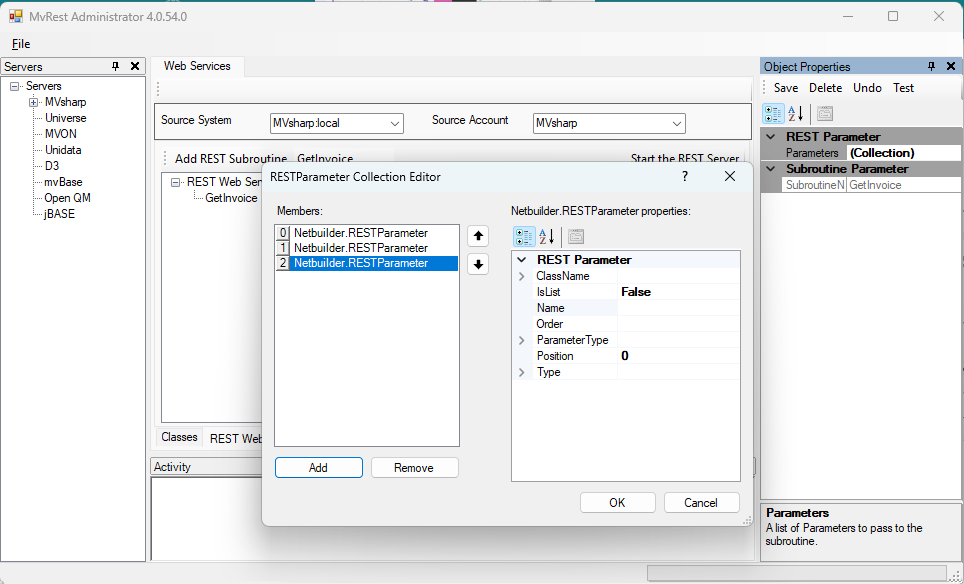
Each parameter can have the following properties:
| Property Name | Description |
|---|---|
| ClassName | If the parametertype is Output and the parameter updates a class, you can select the classname from a list. |
| Name | The name of the parameter. |
| Order | The order in which the subroutine arguments are set. |
| ParameterType | Either Input or Output, depending on whether the value is passed to the subroutine or the value is used to format the JSON document |
| Type | Either String, Json or dynamicarray. |
For our example set the following:
-
Parameter1 Name is InvoiceNo, Order is 1 and ParameterType is Input and Type is String
-
Parameter2 Name is Status, Order is 2 and ParameterType is Output and Type is String
-
Parameter3 Name is Invoice, Order is 3, ParameterType is Output, Type is String and ClassName is Invoice
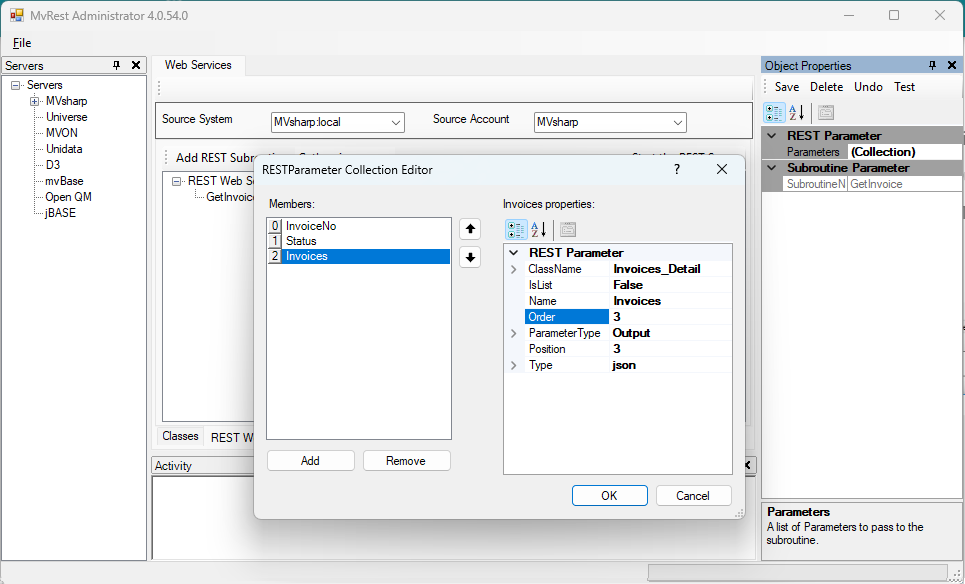
You save the definition by clicking on the subroutine in the Treeview, right clicking and selecting Save.
Test program for this example
Subroutine GetInvoice(InvoiceNo,Status,Invoice)
*-----
*   demo subroutine to test the MVrest REST subroutine API
*   if the InvoiceFile does not exist it is created and populated
*-----
Open "InvoiceFile" To InvoiceFile Else
    Execute "Create.File InvoiceFile"
    Open "InvoiceFile" To InvoiceFile Else Return
    Rec1 = "Customer1,addr line1|addr2|addr3,prod1|prod2|prod3,10|5|22,11.99|88.98|67.12,1099.66"
    Rec2 = "Mr Joe Bloggs,370 Rivonia Blvd|Rivonia|Sandton,123-001|01x-321|667-123,1|2|3,1.99|8.77|12.55,27.44"
    Convert "," To @Am in Rec1
    Convert "|" To @Vm in Rec1
    Convert "," To @Am in Rec2
    Convert "|" To @Vm in Rec2
    Write Rec1 On InvoiceFile , 1000
    Write Rec2 On InvoiceFile , 1001
End
Status = "Record Not Found - ":InvoiceNo
Read Invoice From InvoiceFile , InvoiceNo Then
    Status = "Ok"
End
Return
Deploying the REST application
A complete .NET Core project is created during deployment that can be loaded into VS Code or Visual Studio. All the source code for the REST server is in the project. The project can be debugged by loading the project into VS Code or Visual Studio and running the project in debug mode.
To deploy the project, right click in the REST Web Services tab and select Publish.
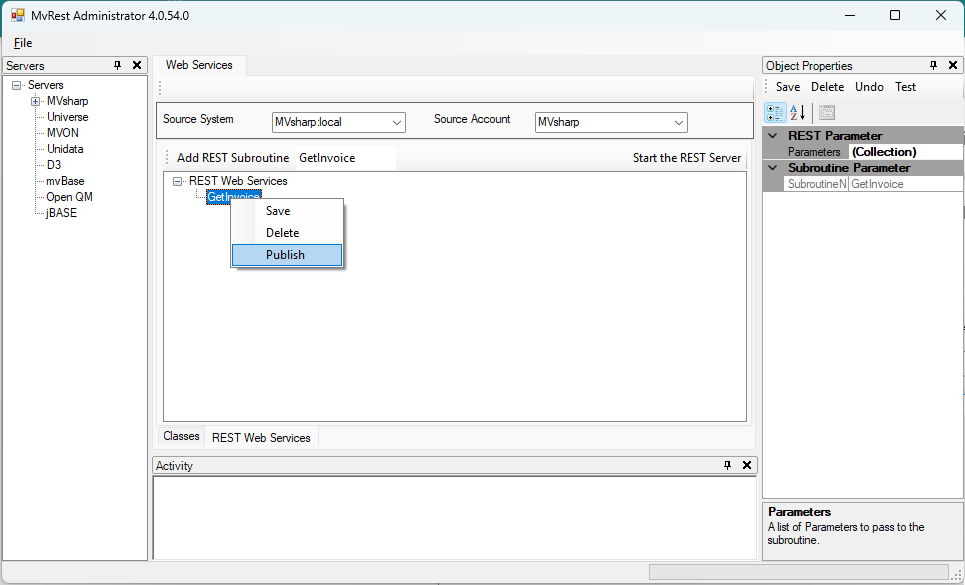
Your project will be deployed into the path specified in the DeploymentPath parameter described in Creating REST Methods.
Once the project is deployed it will be compiled and the compilation results will be displayed. If the compilation fails, there is an incorrect configuration.