Visual Studio Code MVsharp extensions
How to use Visual Studio Code as the MVsharp Development Environment.
Introduction
Visual Studio Code is a feature-rich IDE that allows programmers to develop and debug code in various languages. MVsharp provides developers with the ability to program their MV applications with a variety of programming languages including BASIC, C#, Python, JavaScript and TypeScript. This makes Visual Studio Code an ideal IDE as it supports all the above languages.
In order to fully utilize the power of VS Code, Prosol Group has built a set of extensions to cater for the MVsharp BASIC language. There are also extensions to support all the MVsharp supported languages.
These extensions include the following features:
-
Code highlighting for MV# BASIC Programs
-
IntelliSense for the MV# BASIC Statements and Functions
-
Code folding
-
Code formatting
-
Goto/Peek Definition. Automatically jump to and peek internal subroutines
-
Goto/Peek Definition. Automatically peek/load CALL, CHAIN and INCLUDE routines
-
Syntax checking for GOTO/GOSUBs, LOOPs, CASE statements and IF/THEN/ELSE statements
-
Access your remote MVsharp files and programs
-
Find all references of a word in the current program
-
A visual debugger
Visual Studio Code is available on Windows, Linux and Mac OSX.
Prerequisites
The following environment is required in order to use Visual Studio Code.
- Windows, Linux or Mac OSX machine.
Installing Visual Studio Code
Visual Studio Code can be downloaded from the following link:
https://code.visualstudio.com/Download
You can select the version for your operating system. This guide describes how to install the Windows version of Visual Studio Code.
Depending on your Windows operating system, run either the 32 bit VSCodeUserSetup-ia32-1.62.2.exe or the 64 bit VSCodeUserSetup-x64-1.62.2.exe.
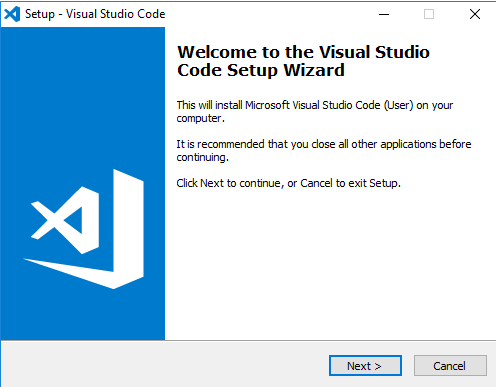
Select Next.
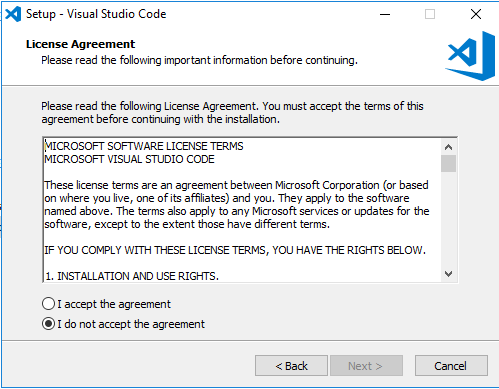
Accept the License Agreement and select Next.
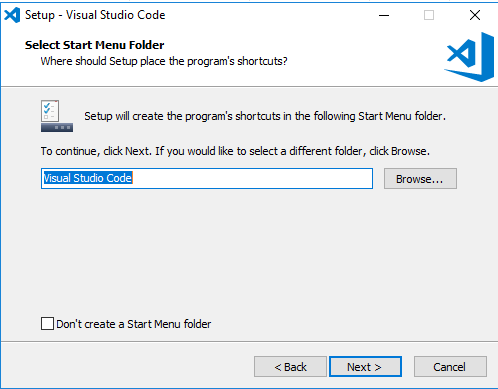
Accept the defaults or specify your folder and select Next.
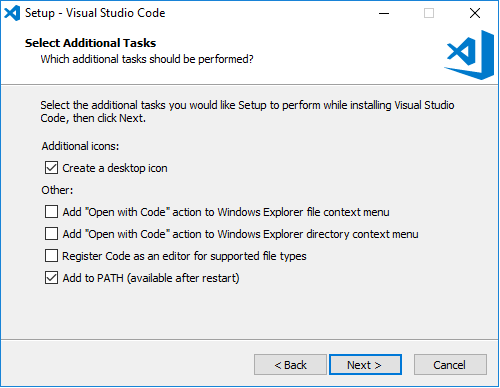
Select the options you would like to include in the install and select Next.
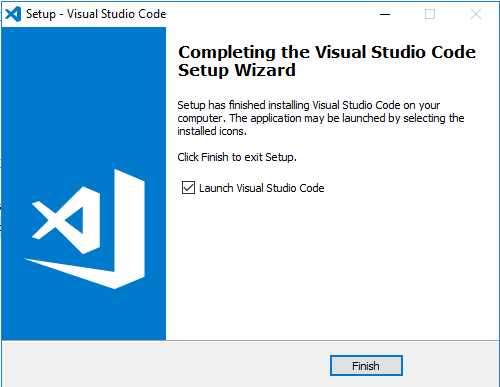
Visual Studio Code is now installed.
Configuring Visual Studio Code for MVsharp
Before we can start using the MVsharp features for Visual Studio Code, we need to install the extensions. VS Code has an automated download and installation process for extensions.
Start VS Code and select the Extensions button.
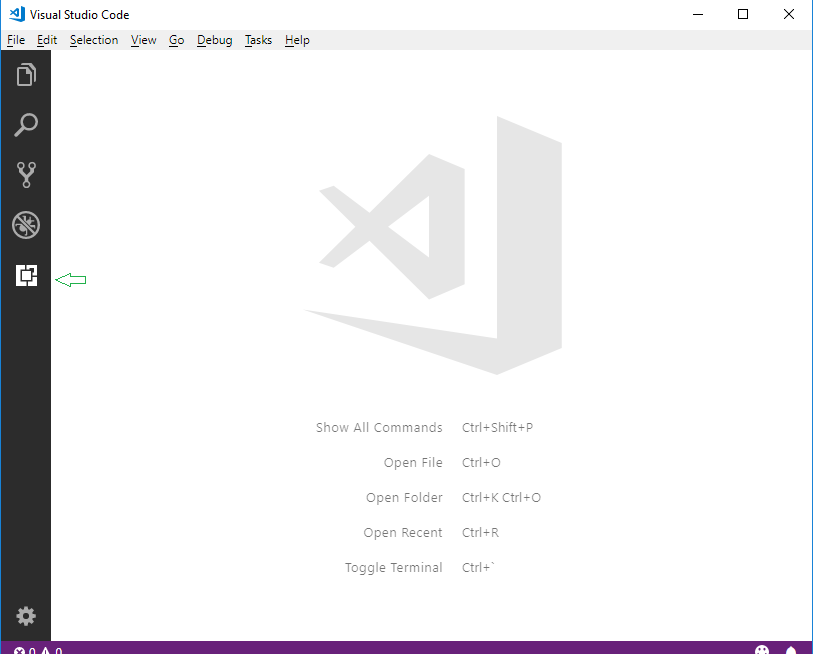
In the search box, type MV and press enter:
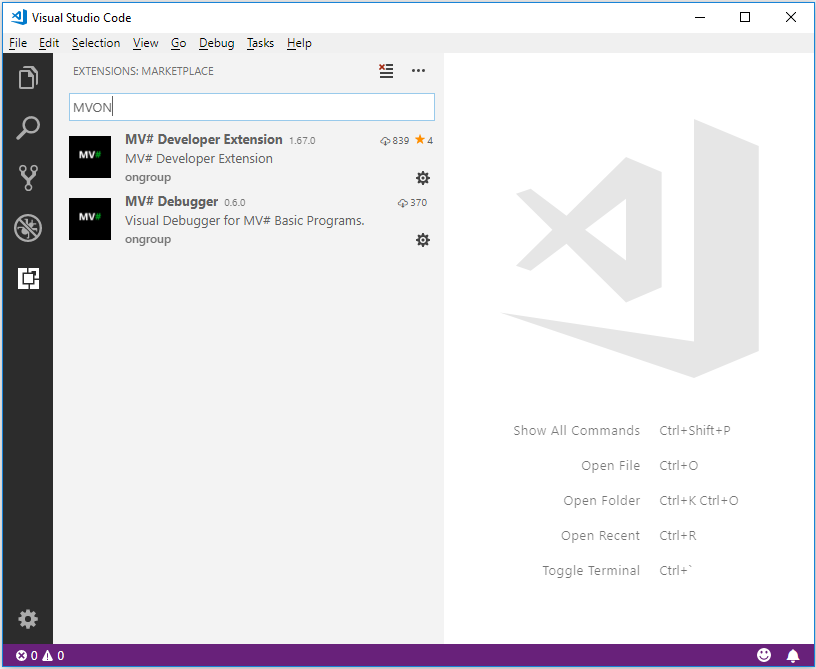
You can select the Developer Extension and the Debugger extension by selecting the download image.
Once the extensions are installed we are ready to start accessing our MVsharp server.
Connecting to an MVsharp Server
The extension allows us to connect to remote MVsharp servers and edit BASIC programs. We need to configure a Workspace that will contain all the parameters required to connect and login to the remote MVsharp Server.
The simplest method is to create a directory on your machine where we will save the Workspace definitions. If we have multiple servers and multiple accounts on each server, we can create multiple Workspaces that each point to a particular server and account.
In order to connect to an MVsharp server, we require the following information:
-
Hostname or IP Address of the MVsharp server.
-
User name to login into the server
-
Password for the user above.
-
Account name to connect to on the MVsharp Server
To create a new Workspace, select "Save Workspace As" from File Menu. In this example, a folder called VSCODE on the E: drive is used to store all the Workspace definitions.
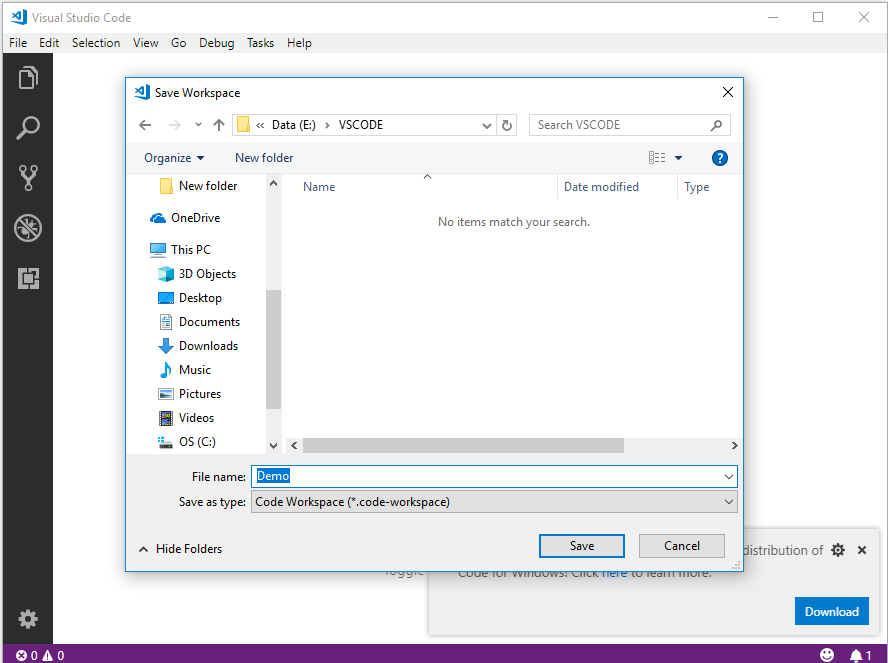
This will create a blank Workspace called Demo that we can now configure to point to our MVsharp server.
To configure the connection parameters, select File > Preferences > Settings from the menu.
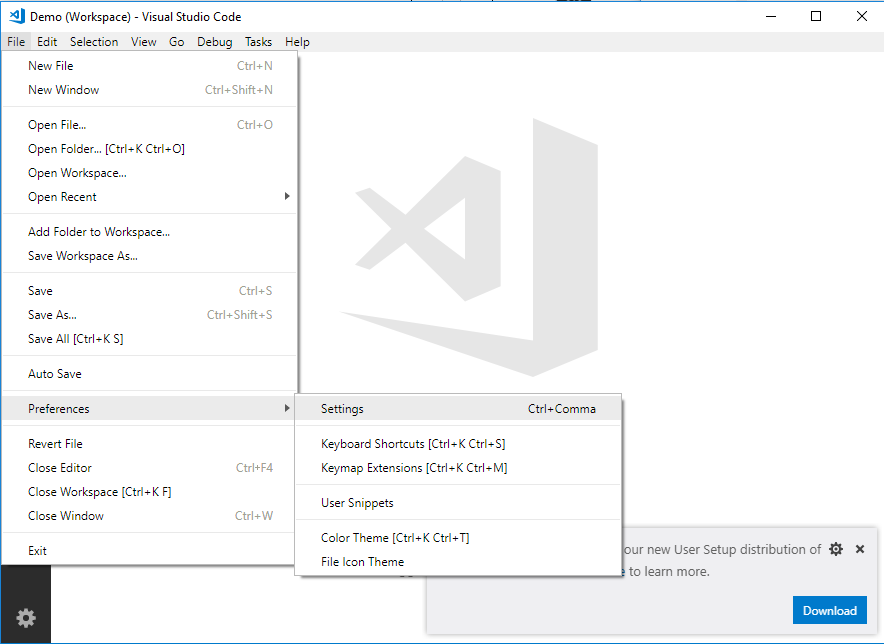
This will bring up the Settings pane in VS Code. Make sure you select the Workspace Tab, and then type MVsharp in the search box. This will display a list of all the parameters that can be set for the MV# Developer extension.
Hover your mouse over a parameter and you will be given the option to Edit and Copy to Settings.
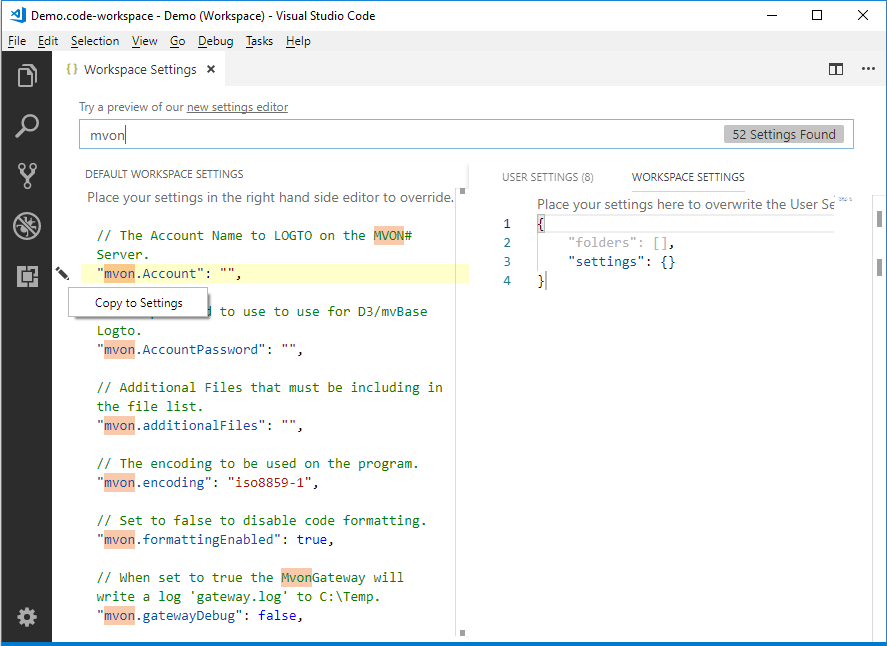
After adding all the parameters to the workspace, your settings should look like this:
{
    "folders":[
        {
            "uri": "RestFS:/",
            "name": "Account - DEMO"
        }
    ],
    "settings": {
        "MVsharp.RestPath": "http://localhost/MVsharprest/"
    }
}
You can copy and paste the above and make the necessary changes for your system.
These are the base settings required to connect to your MVsharp server. Press Ctrl+S to save your settings.
Testing the connection
We can test whether our connection to MVsharp works by pressing F1. VS Code will prompt you for the command to run. Type Connect to display all commands containing "Connect":
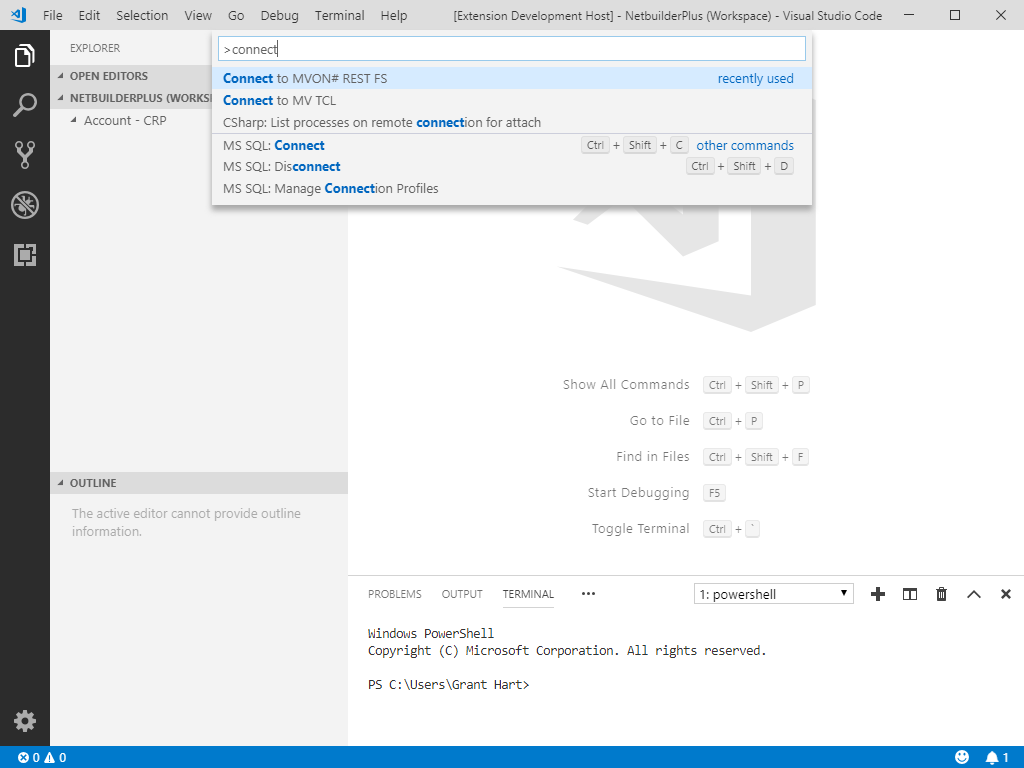
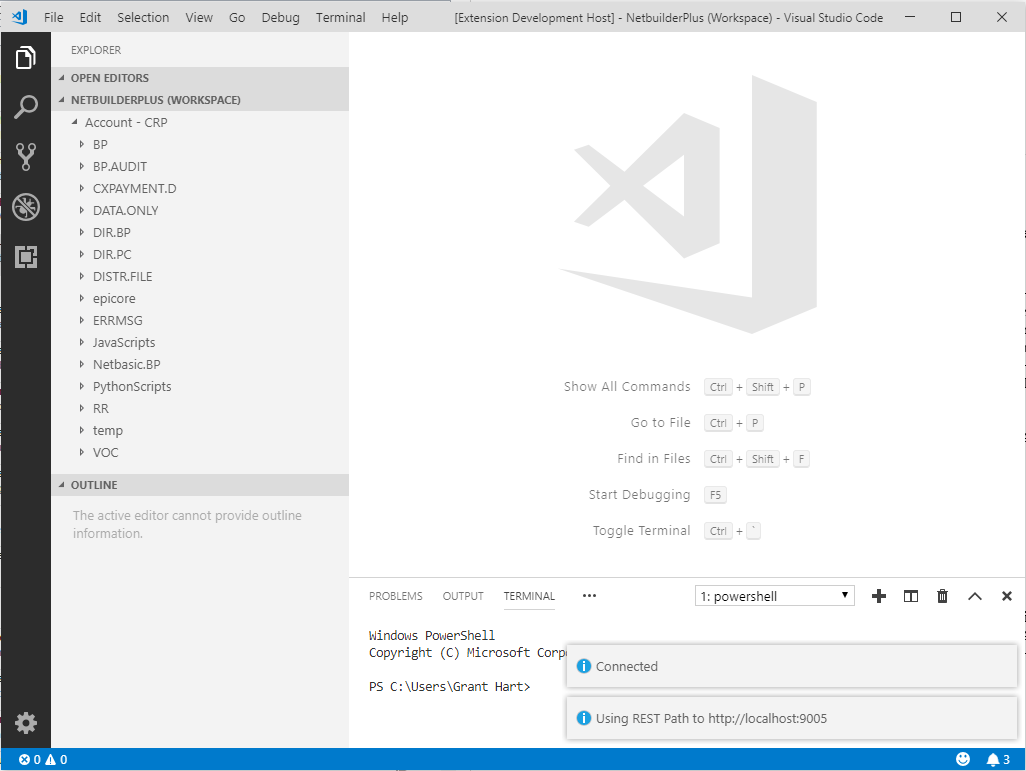
Select Connect to MVsharp# REST FS and the extension will connect to the server and retrieve a list of Directory files from the server.
If the connection is successful, the following 3 messages will appear at the bottom left of the screen.
Associating Programs with MVsharp
Most programming languages use a file extension that says what language the file is: Python is .py, C# is .cs etc. MV BASIC does not follow this concept.
In order to know that we are editing a BASIC program to enable syntax highlighting, IntelliSense and linting, we need to tell VS Code that files in the Workspace are linked to MVsharp. This is achieved by adding the following setting to your Workspace settings.
{
    "folders":[
        {
            "uri": "RestFS:/",
            "name": "Account - DEMO"
        }
    ],
    "settings": {
        "MVsharp.RestPath": "http://localhost/MVsharprest",
        "files.associations": {"*":"MVsharp"}
    }
}
Additional MV# Developer Settings
The following settings are available to customise your VS Code MV# Developer experience.
| Setting | Description |
|---|---|
| MVsharp.margin | The number of characters to use as a margin when formatting. |
| MVsharp.indent | The number of characters to use when indenting code blocks. |
| MVsharp.useCamelCase | Use camel case for IntelliSense keywords. |
| MVsharp.ignoreGotoScope | The linter will not highlight GOTOs that jump into the middle of loops. |
| MVsharp.formattingEnabled | Set to false to disable code formatting. |
MV# Developer Features
The following is a list of features that the extensions offer MV Developers when using VS Code.
Syntax Highlighting
!
*-----Insert Text
!
CASE UPCASE(ANS) = 'I' OR UPCASE(ANS) = 'IB' OR UPCASE(ANS) MATCHES "'I '0X" OR UPCASE(ANS) MATCHES "'IB '0X"
GOSUB 1030
!
*-----Toggle Block Confirm
!
CASE UPCASE(ANS) = 'BLOCK'
  IF BLOCK THEN
    BLOCK = FALSE
    CRT 'BLOCK operation verification = disabled.'
  END ELSE
    BLOCK = TRUE
    CRT 'BLOCK operation verification = enabled.'
  END
  GOSUB 1000
Code is highlighted based on the current theme selected for VS Code.
IntelliSense
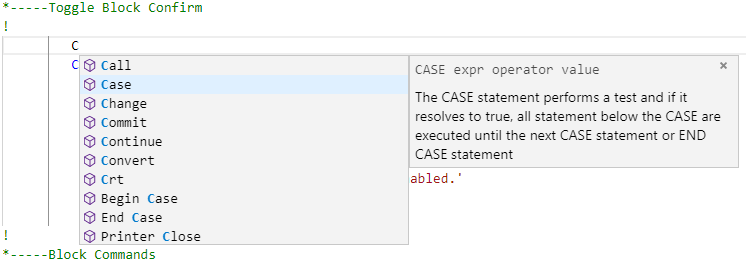
As you type your program, you will be prompted with available statements and functions including the syntax and description.
Find All References
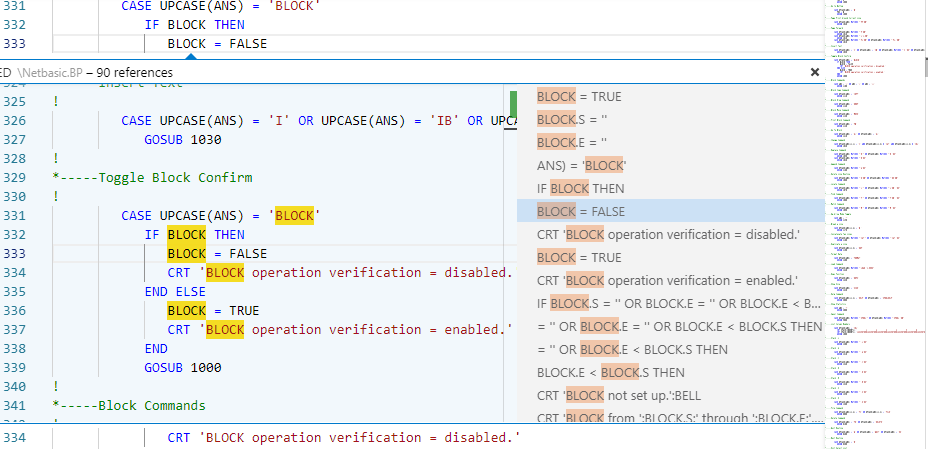
You can find all references to a word in your program by right clicking on a word and selecting Find All References from the menu.
The display consists of 2 panels: the right panel lists the lines containing the word and the left panel shows the actual code block. Clicking on a line in the right panel will take you to the code block.
Goto/Peek Definition
If you right click on an internal or external subroutine name and select Peek Definition, a window appears showing the internal or external subroutine.
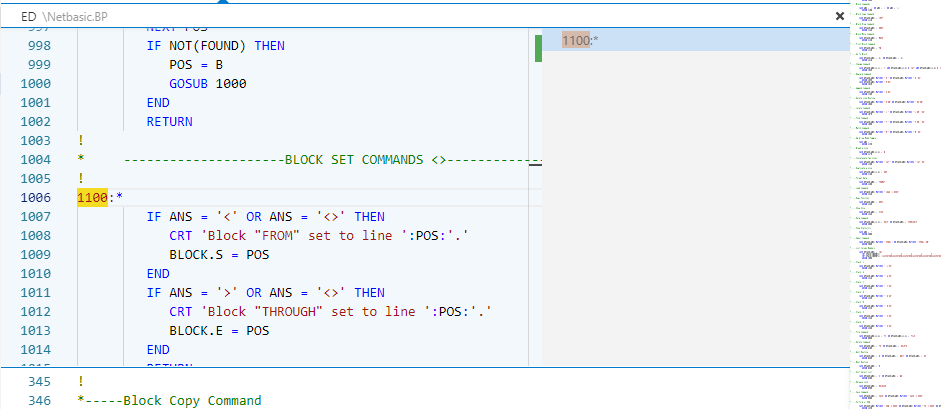
If you select Goto Definition, the cursor is moved to the start of the subroutine.
Internal Subroutine lookup
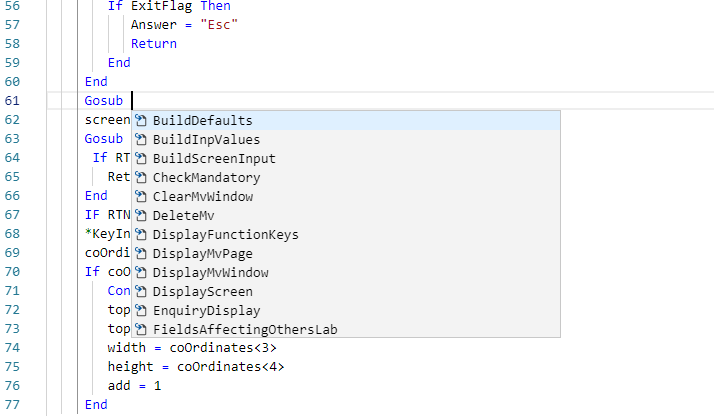
Pressing Ctrl+Space after the word GOTO, GOSUB or GO TO, will allow you to select from defined internal subroutines in your program.
Compiling and Cataloging your programs
Right Clicking inside the code window allows you to select 3 options:
- Catalog Basic Program -- catalogs the BASIC program
- Compile Basic Program -- compiles the basic program.
- Compile Basic Program with Debug -- compiles with the debug flag set.
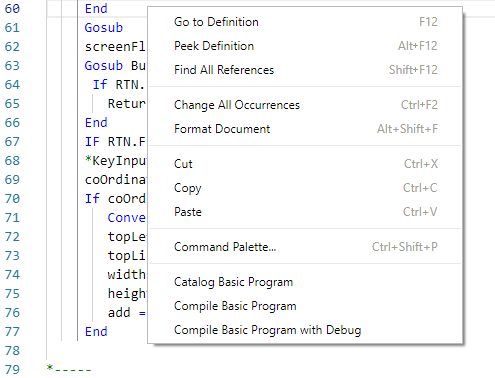
After the option is selected, the results will be displayed in a message box at the bottom of the screen. If an error is detected, the editor will place the cursor on the line where the error occurs.
Formatting Programs
Right Clicking and selecting Format Document, will format your BASIC program. The formatting is based on 2 settings, MVsharp.indent and MVsharp.margin that have default values of 3 and 5.
Connecting to other MV Platforms
The VS Code MV# Developer extensions allow you to connect to most MV platforms and provides all the features described above. The MVsharpGateway is a Windows service that acts as a router to access each of the different MV platforms.
As each platform might require different parameters, a Workspace configuration example is provided for each of the following MV platforms.
- Universe
- Unidata
- OpenQM
- jBASE
- D3
- MvBase
The path to the Gateway Installation media is:
C:\Users\{User Name}\.vscode\extensions\MVsharp-1.85.0\Gateway
It is a standard Windows installer module. Copy the installer to the machine that is going to run the Gateway and install. The Gateway exposes a REST File System that can be accessed via VS Code. The port that the REST pipeline listens on defaults to 9005.
Universe
{
  "folders":[
  {
    "uri": "RestFS:/",
    "name": "Account - Universe"
  }
],
    "settings": {
        "MVsharp.RestPath": "http://localhost:9005/",
        "MVsharp.UseGateway": true,
        "MVsharp.RemoteHost": "192.168.137.102",
        "MVsharp.GatewayType": "Universe",
        "MVsharp.UserName": "MVsharp",
        "MVsharp.Password": "MVsharp#",
        "MVsharp.Account": "SUPER-GROUP",
        "files.associations": {"*":"MVsharp"}
    }
}
| Setting | Value | Description |
|---|---|---|
| MVsharp.useGateway | true | Indicate that the gateway must be used. |
| MVsharp.RestPath | http://localhost:9005 | Path to Gateway. |
| MVsharp.remoteHost | 192.168.137.102 | The IP address or host name of the server running the UniVerse database. |
| MVsharp.gatewayType | Universe | Connecting to a Universe server. |
| MVsharp.UserName | MVsharp | The Windows/UNIX user id to log into the server. |
| MVsharp.Password | MVsharp | The password for the user above. |
| MVsharp.Account | SUPER-GROUP | The account name on Universe to connect to. This must be defined in the UV.ACCOUNT file in the UV account. |
Unidata
{
  "folders":[
  {
    "uri": "RestFS:/",
    "name": "Account -- SUPER-GROUP"
  }
],
    "settings": {
        "MVsharp.RestPath": "http://localhost:9005/",
        "MVsharp.UseGateway": true,
        "MVsharp.RemoteHost": "192.168.137.102",
        "MVsharp.gatewayType": "Unidata",
        "MVsharp.UserName": "MVsharp",
        "MVsharp.Password": "MVsharp#",
        "MVsharp.Account": "SUPER-GROUP",
        "MVsharp.AccountPath": "/usr/data/SUPER-GROUP",
        "files.associations": {"*":"MVsharp"}
    }
}
| Setting | Value | Description |
|---|---|---|
| MVsharp.UseGateway | true | Indicate that the gateway must be used. |
| MVsharp.RestPath | http://localhost:9005 | Path to Gateway. |
| MVsharp.RemoteHost | 192.168.137.102 | The IP address or host name of the server running the UniData database. |
| MVsharp.GatewayType | Unidata | Connecting to a Unidata server. |
| MVsharp.Password | MVsharp | The password for the user above. |
| MVsharp.Account | SUPER-GROUP | A name for this account. |
| MVsharp.AccountPath | /usr/SUPER-GROUP | The path on the Unidata machine to the Unidata account. |
OpenQM
{
  "folders":[
  {
    "uri": "RestFS:/",
    "name": "Account - PRC"
  }
],
    "settings": {
        "MVsharp.UseGateway": true,
        "MVsharp.RemoteHost": "192.168.137.102",
        "MVsharp.gatewayType": "QM",
        "MVsharp.UserName": "MVsharp",
        "MVsharp.Password": "MVsharp#",
        "MVsharp.Account": "PRC",
        "files.associations": {"*":"MVsharp"}
    }
}
| Setting | Value | Description |
|---|---|---|
| MVsharp.useGateway | true | Indicate that the gateway must be used. |
| MVsharp.remoteHost | 192.168.137.102 | The IP address or host name of the server running the OpenQM database. |
| MVsharp.gatewayType | QM | Connecting to an OpenQM server. |
| MVsharp.UserName | MVsharp | The Windows/UNIX user id to log into the server. |
| MVsharp.Password | MVsharp | The password for the user above. |
| MVsharp.Account | PRC | The account name on the QM server to connect to. This must be defined in the ACCOUNTS file in the QMSYS account. |
jBASE
{
  "folders":[
  {
    "uri": "GatewayFS:/",
    "name": "Account - PRC"
  }
],
    "settings": {
        "MVsharp.useGateway": true,
        "MVsharp.remoteHost": "192.168.137.102",
        "MVsharp.gatewayType": "jBASE",
        "MVsharp.gatewayPort": 9004,
        "MVsharp.gatewayHost": "154.73.73.6",
        "MVsharp.UserName": "MVsharp",
        "MVsharp.Password": "MVsharp#",
        "MVsharp.Account": "",
        "files.associations": {"*":"MVsharp"}
    }
}
| Setting | Value | Description |
|---|---|---|
| MVsharp.useGateway | true | Indicate that the gateway must be used. |
| MVsharp.remoteHost | 192.168.137.102 | The IP address of the server running the jBASE database. |
| MVsharp.gatewayType | jBASE | Connecting to a jBASE server. |
| MVsharp.gatewayPort | 9004 | The default port number that the Gateway is listening for connections on. |
| MVsharp.UserName | MVsharp | The Windows/UNIX user id to log into the server. |
| MVsharp.Password | MVsharp | The password for the user above. |
| MVsharp.Account | This is blank, jBASE uses the default path of the user for the account. |
A record in the MD called MVsharpFILES can be used as a list of available files; otherwise all files are displayed.
D3
{
  "folders":[
  {
    "uri": "GatewayFS:/",
    "name": "Account - DM"
  }
],
    "settings": {
        "MVsharp.useGateway": true,
        "MVsharp.remoteHost": "192.168.137.102",
        "MVsharp.gatewayType": "D3",
        "MVsharp.gatewayPort": 9004,
        "MVsharp.gatewayHost": "154.73.73.6",
        "MVsharp.UserName": "dm",
        "MVsharp.AccountPassword": "",
        "MVsharp.Account": "dm",
        "files.associations": {"*":"MVsharp"}
    }
}
| Setting | Value | Description |
|---|---|---|
| MVsharp.useGateway | true | Indicate that the gateway must be used. |
| MVsharp.remoteHost | 192.168.137.102 | The IP address of the server running the D3 database. |
| MVsharp.gatewayType | D3 | Connecting to a D3 server. |
| MVsharp.gatewayPort | 9004 | The default port number that the Gateway is listening for connections on. |
| MVsharp.UserName | dm | The D3 User name to log in with. |
| MVsharp.AccountPassword | Specify the account password if a password is set on the account. | |
| MVsharp.Account | dm | The D3 account to connect to. |
MSVP must be configured for the above account and the user must have MSVP access. A record in the MD called VSCODEFILES can be used as a list of available files; otherwise all files are displayed.
Testing remote connectivity
Once your Workspace is configured for your MV platform, you can connect to your MV platform by pressing F1 in VS Code and typing Connect in the search field.
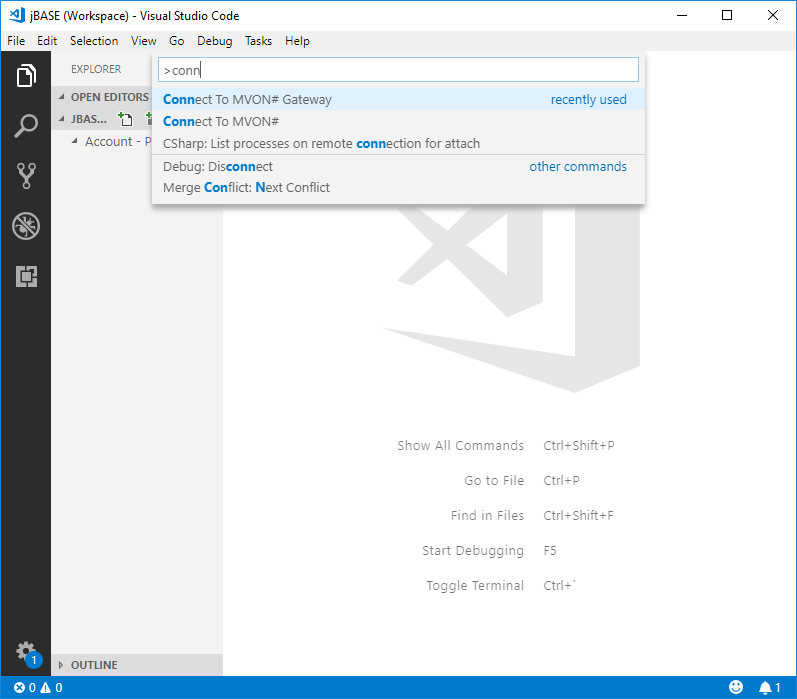
Select the Connect to MVsharp# Gateway option. Once the connection is successful, a list of files will be displayed in the Files pane.
Debugging remote connection issues
There is an additional parameter that can be specified in your Workspace
"MVsharp.gatewayDebug": true
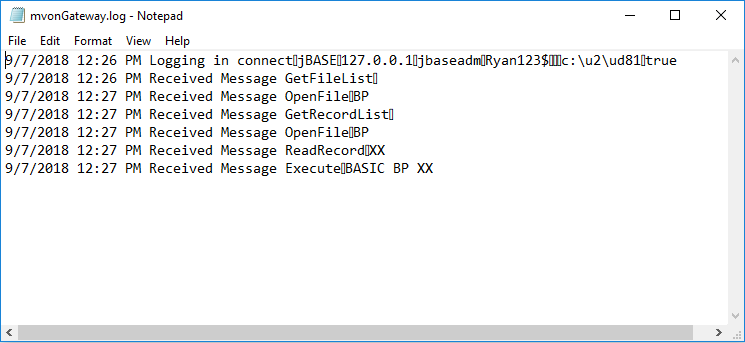
When this is specified, the MVsharp Gateway will write a log of any issues encountered while connecting to your remote MV platform. This can be used to identify any setup issues.
The log file is created in c:\temp called MVsharpGateway.log
MV# Debugger Extension
The MVsharp# Debugger extension enables powerful visual debugging of your MVsharp BASIC programs. This feature is ONLY available for MVsharp, as MVsharp supports the real time debugging protocol required by VS Code.
In order to debug BASIC programs in VS Code, the programs need to be compiled using the debug option. You can select Compile Basic program with Debug by right clicking in the code editor or alternatively you can compile from the command line using:
BASIC BP XX (D
To enable debugging in VS Code, we need to tell our MVsharp environment that VS Code debugging is available. An entry VSCODEDEBUG must be added to the MVSHARP.CONFIG record in the VOC:
Starting the debugger
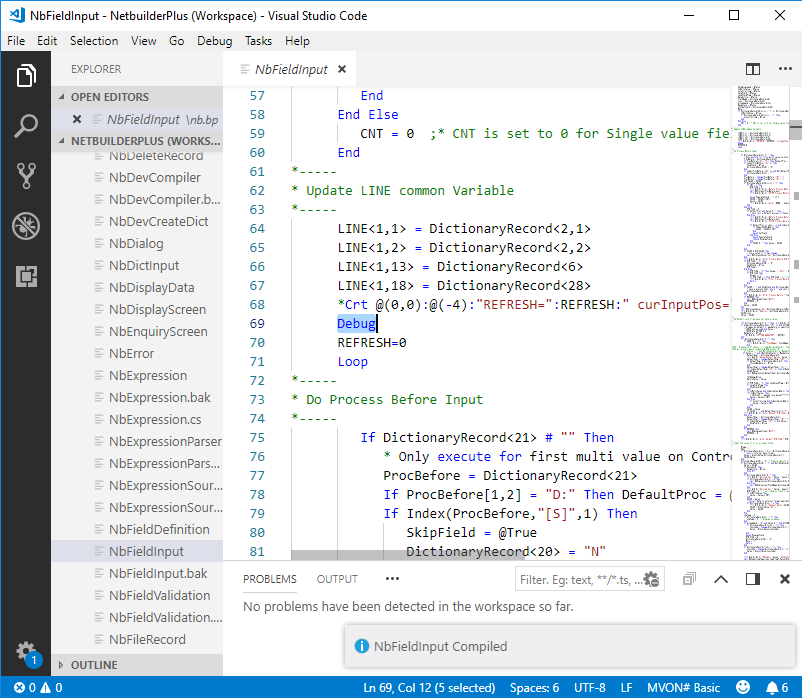
You first need to load the subroutine that you wish to debug into the code editor. Place a DEBUG statement just prior to where you want the debugging to start and compile the program with debug.
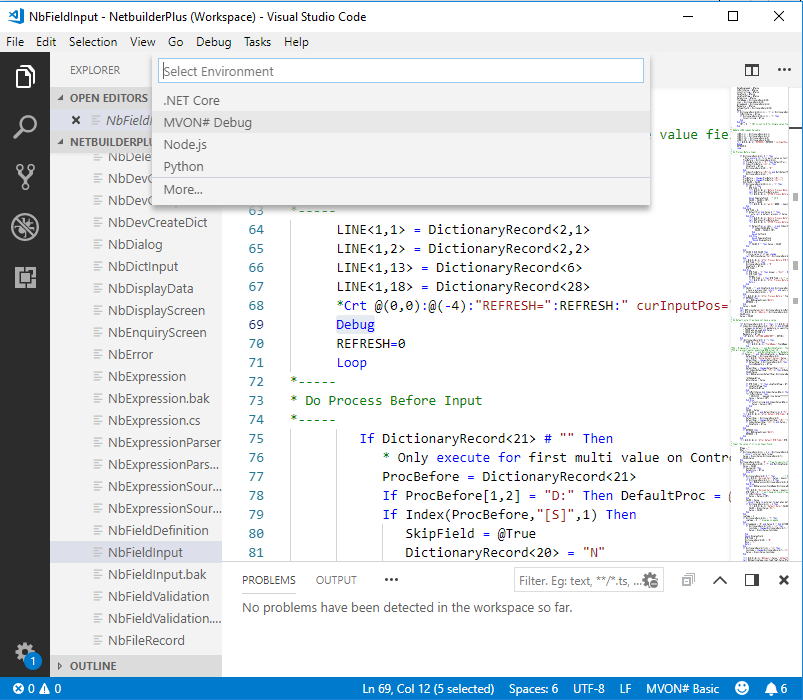
We start the debugger by pressing F5 in the editor window and selecting MVsharp# Debug from the drop down list:
The debug menu bar will appear to indicate that the debugger is now active.
You can now run your BASIC program and when the program reaches the DEBUG statement, VS Code will automatically display the debug panel and highlight the current line of code.
Debugging features
You can step through your code by pressing F10, the debugger will move to the next line to be executed. Pressing F5, will continue with the program until the next DEBUG statement, breakpoint or the program terminates.
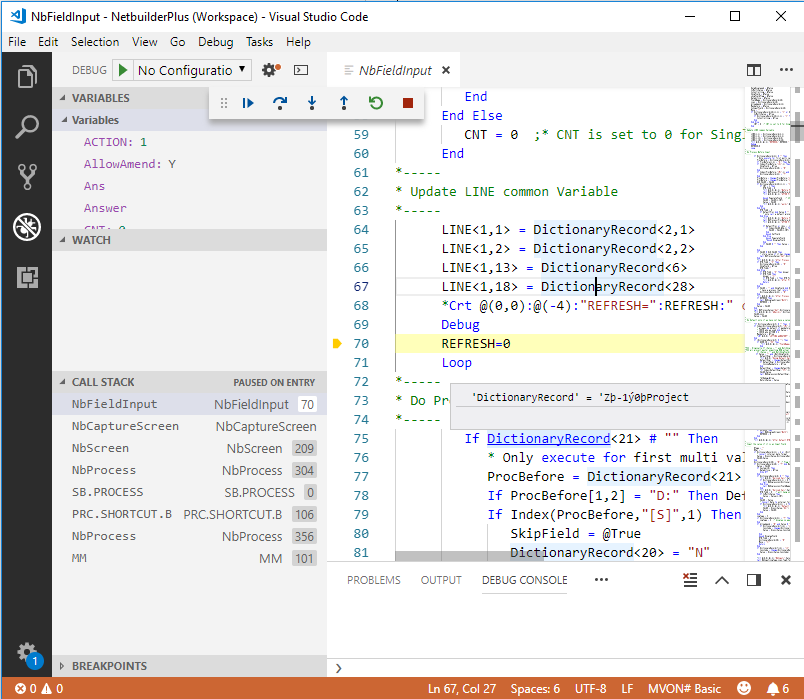
If you hover your cursor above a variable, the contents of the variable are displayed in a panel.
A list of all variables and their contents is displayed in the Variables pane on the left hand side:
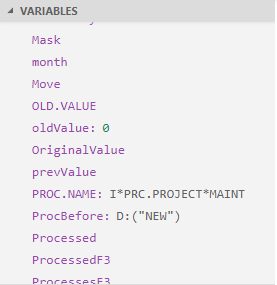
These values are automatically updated as you step through your code.
Call Stack
The call stack is a powerful feature of the MVsharp debugger. It shows the trace of all the programs called and the line number that they were called on:
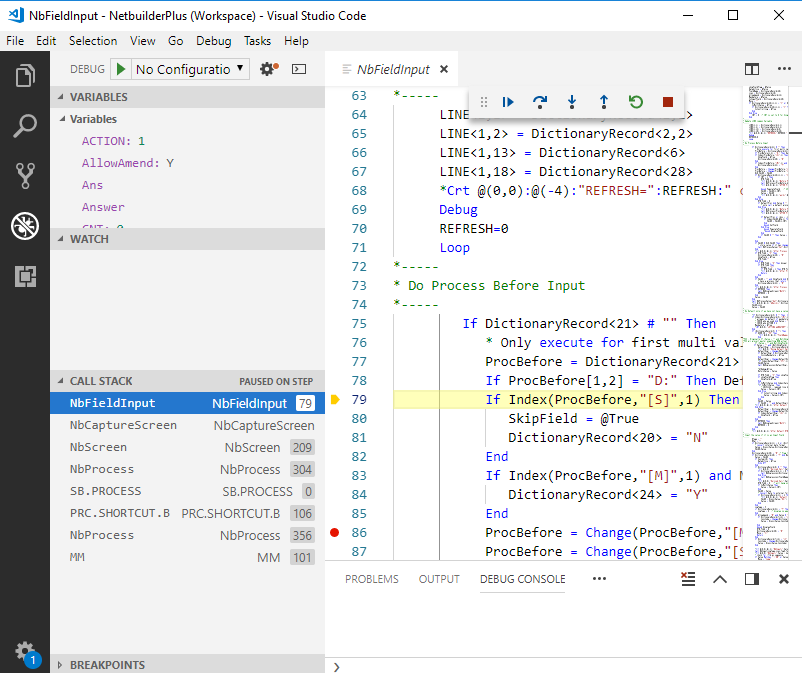
If no line number is displayed, the program was not compiled with the DEBUG flag.
The call stack is interactive and if you select an entry from the call stack, the editor automatically loads the program and shows you the line where the program was called from.
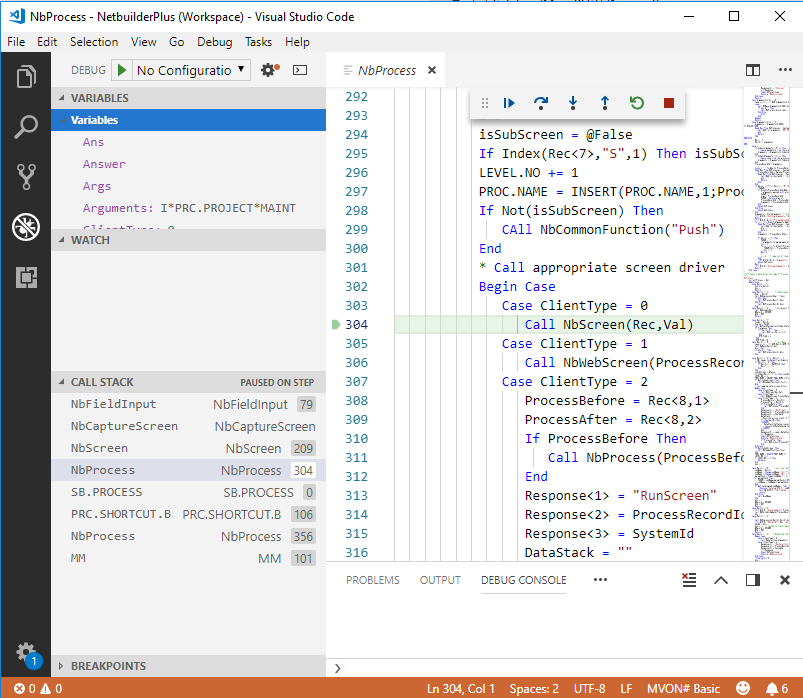
All variable information for the entire call stack is passed to the debugger so you can interrogate any variable in any of the programs in the call stack.
MV# TCL Extension
The MV# TCL Extension gives IntelliSense, syntax highlighting and syntax checking to a TCL session. It also starts an interactive terminal session where you can execute and see the results of your TCL statements.
Currently the TCL language support is based on MVsharp; other MV dialects will be included in the future.
You must have already created the correct settings to connect to your MV platform as described in the above section of the document.
A TCL session is created by opening or creating a document that has a .tcl suffix.
If your target MV platform is not MVsharp, you will also need to install the MVsharpGateway as described in the above section. The Gateway must be the latest that can be found in the path:
C:\Users\{UserName}\.vscode\extensions\tcl-0.1.0\Gateway
The following additional settings need to be configured for the TCL extension:
| Setting | Description |
|---|---|
| tcl.sshCommand | The command to invoke a session on your MV platform. This can be telnet or ssh if your platform supports it. |
| tcl.parameters | Parameters to pass to the session once it has been established. This could include login credentials and a LOGTO the account you wish the TCL session to be active in. |
"tcl.parameters": [
  "Grant Hart",
  "xxxxxxx$",
  "LOGTO PRC"
],
"tcl.sshCommand": "telnet localhost 2023",
Establishing a TCL session
Open a document with the suffix .tcl and right click in the editor window:
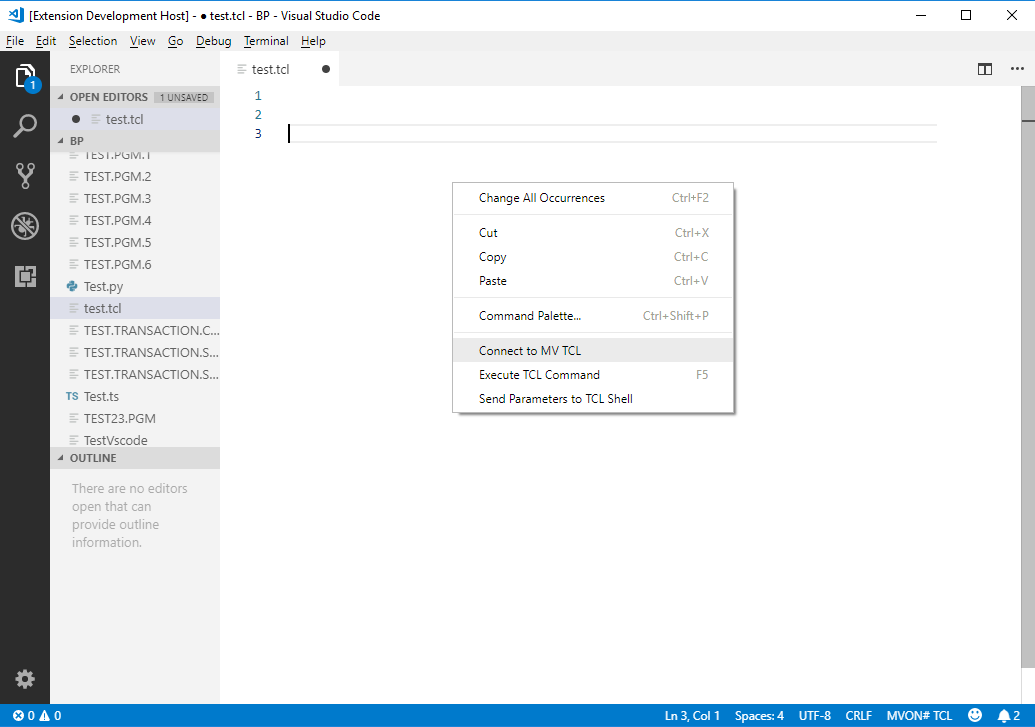
Select the Connect to MV TCL option from the menu bar. This will open a new terminal session and execute the command you configured in the tcl settings.
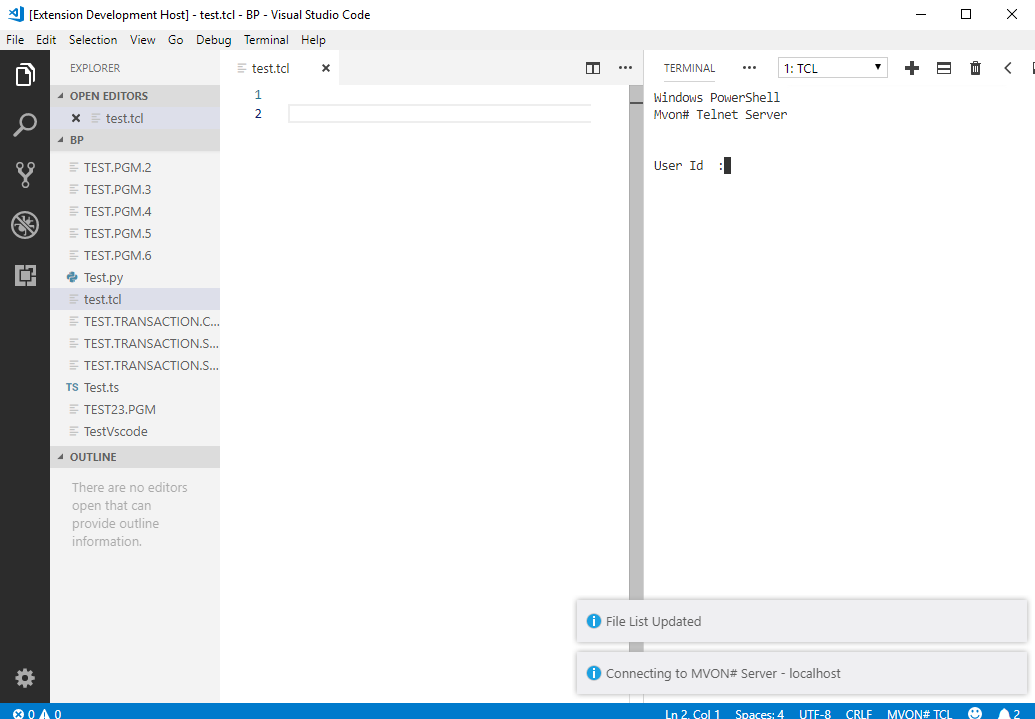
You can right click on the editor window and select Send Parameters to TCL shell from the menu bar to pass the parameters to the session. This automatically connects to your MV platform and loads a list of files that exist in the specified account.
TCL Features
IntelliSense
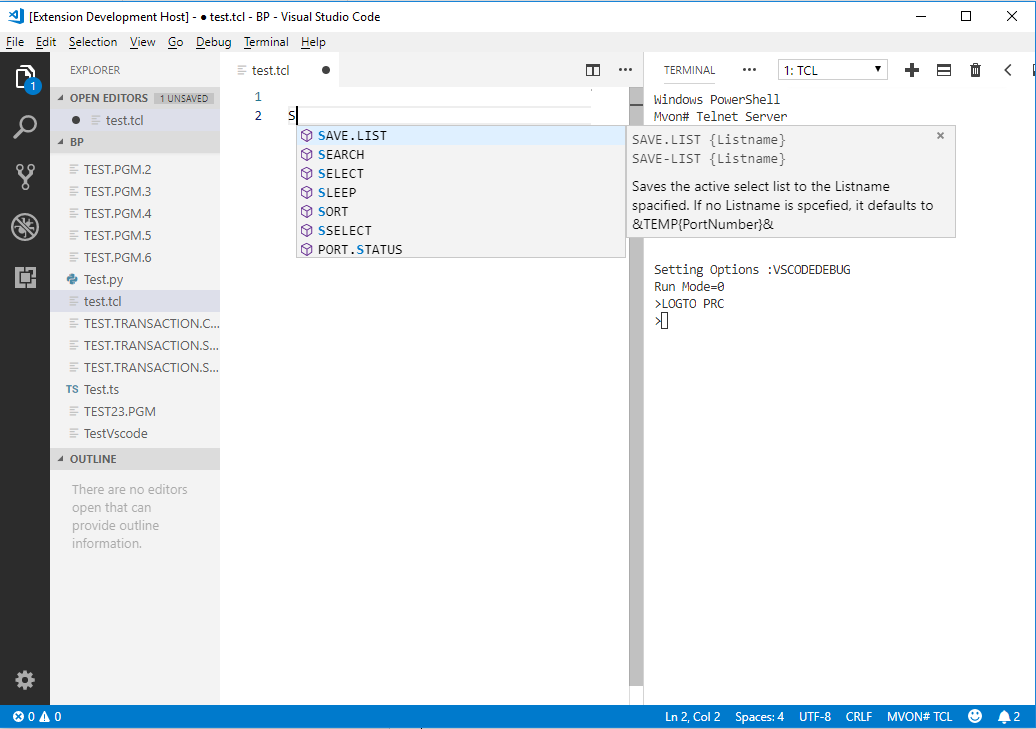
As you begin typing, a list of available TCL commands is displayed for your selection. It also displays the syntax that will be required.
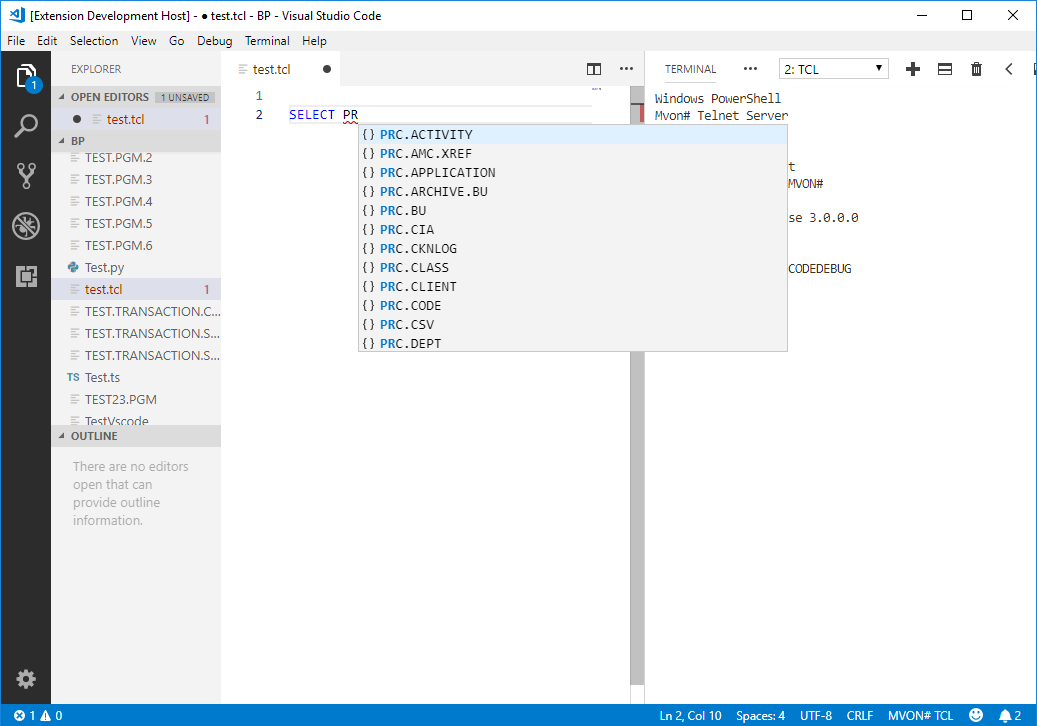
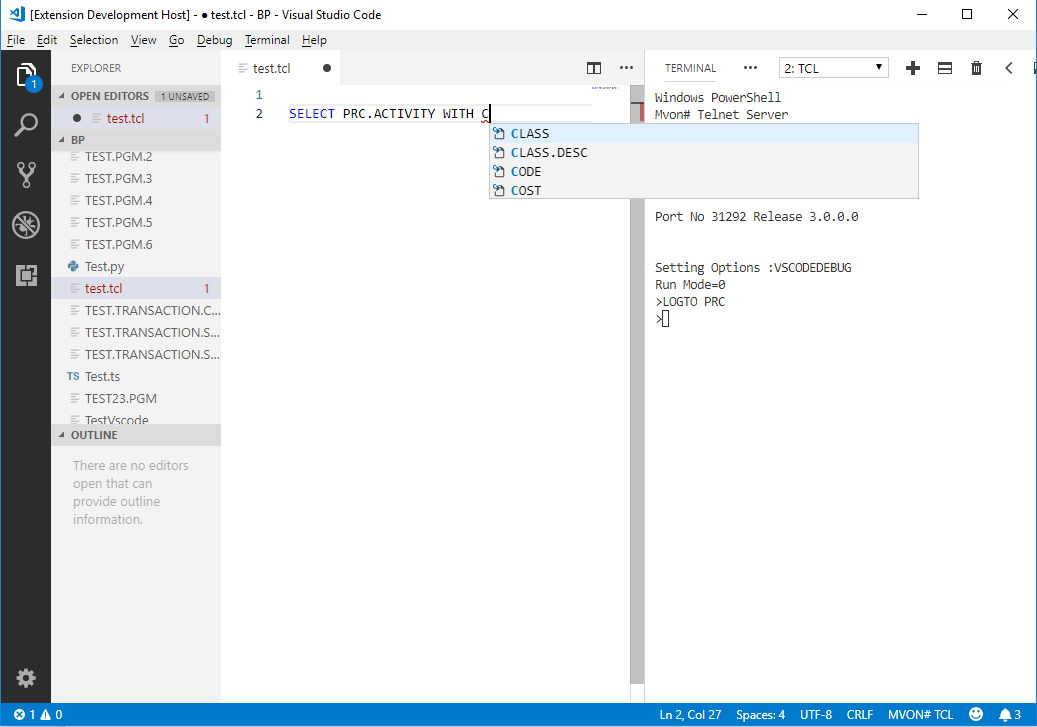
The IntelliSense takes cognisance of the type of TCL sentence you are creating and will display a list of filenames, dictionary names and item names if your sentence requires them.
Automatically execute script lines
You can execute the current statement by pressing F5 on the line you wish to execute:
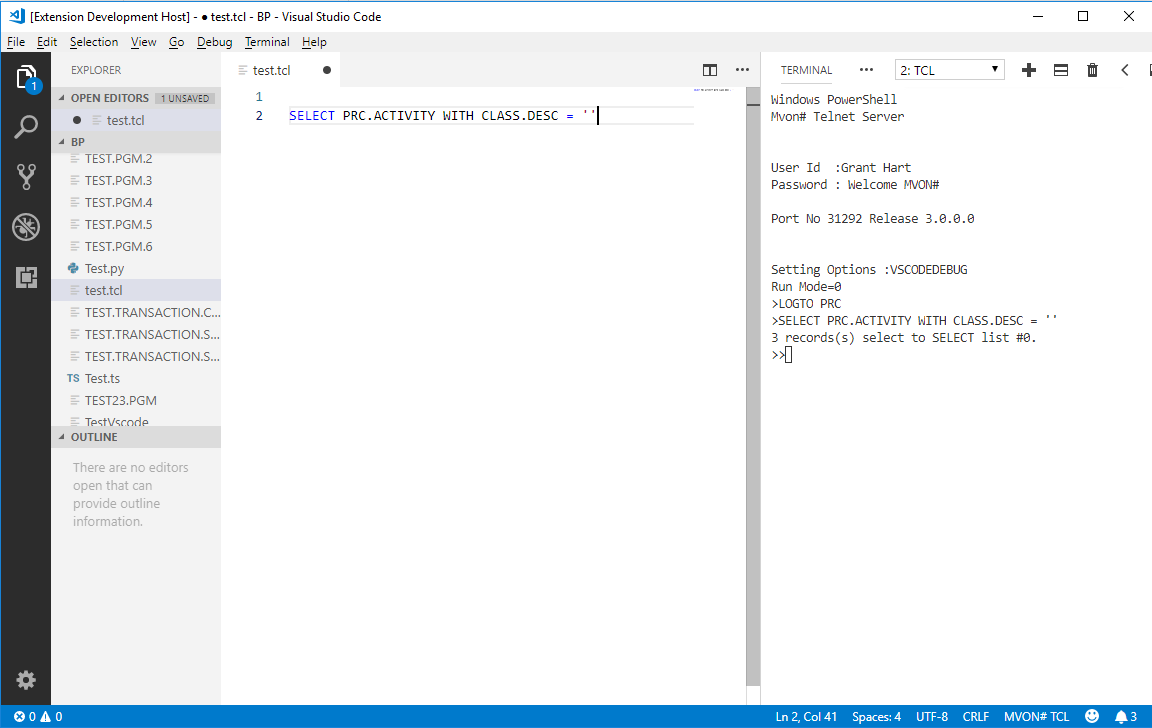
Multiple statements can be executed by selecting the lines you wish to execute and then pressing F5.
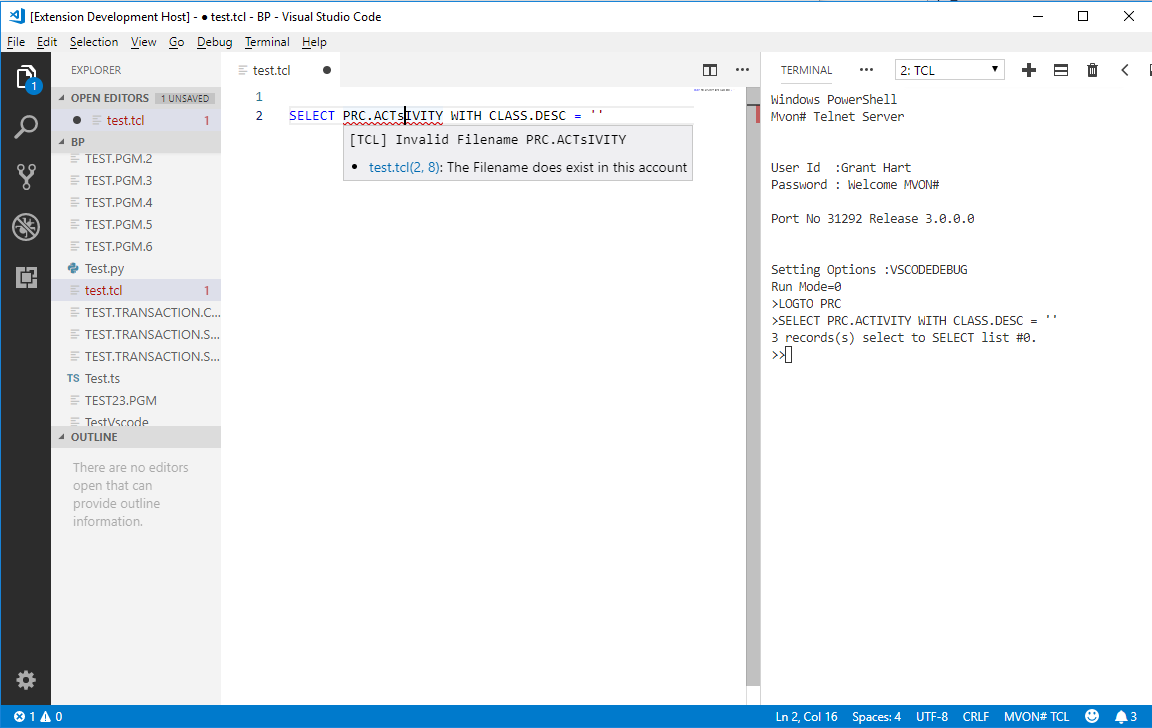
Error highlighting
The extension evaluates your statement and highlights any errors it finds, such as invalid file names and invalid dictionary items.
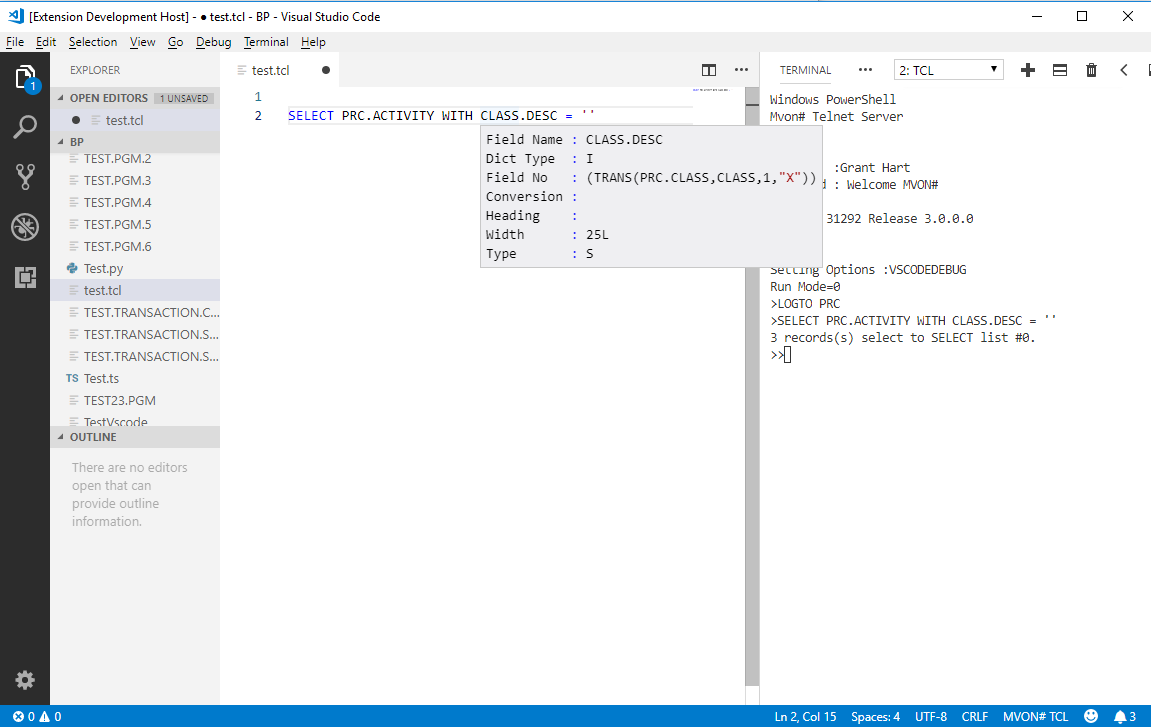
Dictionary details display
If you hover your mouse over a dictionary item, the details of that dictionary item are displayed.